This is a sponsored post written by me on behalf of Frigidaire and Lowe’s. All opinions are 100% mine. Get the kitchen you’ve always dreamed of by building this DIY Kitchen Island. It’s easy to create and provides great storage! Get the free plans at
When we decided to have our Frigidaire Professional Appliances installed, we had a few things we wanted to change in our kitchen. I already shared with you how I altered our kitchen cabinet next to the stove and opened things up. I also took out some of our cabinets that were attached to the wall and built a walk around DIY kitchen island, therefore making it much easier to move around in the kitchen.

In the winter we use the back door in the kitchen to enter our house, but there is never a place to take off our shoes since the door would open straight into the cabinets. Now we can fully open the door and make room for everyone. The kitchen is also the room where everyone seems to congregate, so it’s nice to have a place were people can gather around and eat snacks or serve meals!
How To Make A Kitchen Island Out Of Base Cabinets
Building an Island might sound a little scary, but it’s not as hard as you might think! I’m going to walk you through the whole process. You just have to take it one step at a time!
The majority of this island is put together with pocket holes to which I will refer to as “PH” in the plans below. I used my Kreg Jig to create these pocket holes along with the appropriate size Kreg pocket hole screws.
Before we get started I want to mention that I think it’s best to make cuts as you go. Sometimes you might get off a 1/16″, and it will throw off the rest of your cuts. That’s just a tip of mine. If you cut with awesome precision then you might be able to make all your cuts first, but I’m not that good!
How To Makeover A Kitchen Island On A Budget
Then I moved on to the dividers which will hold the drawers. For this step I made sure my pocket holes were facing towards each other on the inside. That way I don’t see them since the drawers fill that space. Also the dividers are 1/4″ shorter from from to back that the sides of the island. This leaves a recessed space where I placed the back panel. See image below. It doesn’t matter what side the recess is on, but once it’s in place, that needs to remain the back side.
Once I had my dividers in place I attached the braces in the back to insure that the dividers didn’t bow or break off.
Next up I added the shelf brackets with my nail gun and wood glue. I didn’t permanently attach the shelves just in case I ever wanted to remove them.
For All Things Creative!: My Diy Kitchen Island
Because I wanted to have the bottom of the cabinet flush with the face framing, I added another shelf in the bottom of each cabinet space. Just a little note, before I completed this step it would have been easier to install the leg frame here, but I actually changed up some of my ideas mid way so it didn’t work out for me, but it could for you! That way the screws could be hidden by the extra shelf rather than countersinking and using wood filler.

I added my back panel in. Then I decided to recess this to avoid all the extra unfinished edges on the sides of the DIY Kitchen island. Next I nailed into the braces on the back, around the sides and bottom, and then on the vertical drawer dividers and the actual shelf brackets.
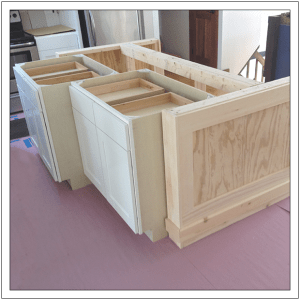
I attached the side trim first using wood glue and brad nails. This is definitely important to cut to size because I wanted it to be flush with all sides. I repeated the same process on the opposite side.
Diy Kitchen Island With Breakfast Bar
Then I added the trim to the back. I made sure to fill all spaces and gaps with wood filler and sand flush.
I built my face frame separately to make sure it was sturdy when attaching it to the cabinet. Next, I attached all pieces with PH’s and wood glue. Since these are 1×2’s I had a little bit of a hard time not splitting the wood. With pocket holes it needs to have two on the ends so that it doesn’t just twist, but that was the cause of splitting the wood. So what I did was put the pocket holes on opposite sides so one on the top part of the 1×2, and on the other side it went on the bottom part so that it wasn’t able to pivot. I also used wood glue to help it set. When building this facing I was constantly checking the measurements to keep it all flush. It’s always better to measure 3 times and cut once!

Once I had my face frame built, I attached it to the front of the cabinet base with wood glue and brad nails.
A Diy Kitchen Island: Make It Yourself And Save Big!
Next I build the leg frame. I built this separately so again, I made sure I had all my measurements correct before making the cuts. I built the frame with pocket holes on the back side of the 2×3’s. When attaching I countersunk screws from the bottom shelf of the cabinet base straight in to the 4×4’s. But it is an option to complete this step before installing those extra shelves in the bottom.
I used the doors from our previous cabinet, but they are easy to build if necessary. I actually had to build the one on my new cabinet by the stove. It’s just made with 1/2″ plywood and then using the 1/4″ trim pieces to obtain the shaker style.
Next I built the drawer boxes. I basically followed this tutorial from Ana White, except I did not leave a space for the drawer face. I wanted my drawer face to be in front of the facing of the cabinet to match the rest of my kitchen. The I attached my drawer faces to the drawer boxes, once they were installed in the DIY Kitchen Island to make sure nothing was crooked. Drawers are probably the hardest part because the measurements do need to be pretty exact. I especially recommend cutting as you go here. No matter how much I squared the island along the way, nothing about the drawers turned out perfect. It’s an art that gets better with practice. By the time I installed my 4th drawer I had it down! Practice makes perfect!
Kitchen Island Trim And Lights
Ashley is a stay at home mom to three beautiful children. She and her husband recently settled in the Midwest after spending the beginning of their marriage in Texas (what a change!). Together they are raising their children, and turning their house into a home one project at a time. Ashley enjoys decorating and crafting, but her true passion lies in redoing old furniture and making things look old.
Do you love our posts? We do to! You want to feature us? YAY! We would love for you to! However, we only allow one photo with a direct link back to Cherished Bliss to be used when featuring our work. You may not use more than one photo or a post in it's entirety without direct written consent from Cherished Bliss. You may not crop or edit any of the photos that belong to Cherished Bliss. We also ask that you do not remove or add any watermarks to our photos. You may write a brief description in your own words when featuring our work, but you may not copy any of the steps in our tutorials, or in our recipes. All of our posts are copyright protected. If you have any questions concerning our Content & Photo Sharing Policy, you may contact us at ashley. gmail com. Thank you!I’m finally sharing my DIY kitchen island with you today! It’s been done for a few months but I wanted it to be perfect (which it’s not) before I shared it. LOL! If you’ve been wanting to learn how to build a Kitchen Island but not sure how or think it will be too hard, it’s not! I promise ANYONE can build this. Anyone.
First I taped off a general area of where I wanted it and got rough estimates and headed to the Home Depot.
How To Build A Kitchen Island • Craving Some Creativity
I got these three cabinet boxes and arranged them in the aisle. It was literally the perfect size! I wanted a lot of drawers and these three were so perfect, in stock and inexpensive!

I got home and put them in place. Somehow I carried them each from my car on my own and felt like superwoman. I put 2×4″ screwed into the wooden subfloor and once it was level, I screwed the cabinet bases into the 2×4. Next, I used shims to make the boxes square.
Then I started the trim work. I used baseboard moulding that I had on hand and ripped 1/4″ MDF board into 4″ strips and nailed them on to cover

0 Comments
Posting Komentar