I have a kitchen sink basket that's leaky and has a bunch of gunk caught under it. I want to replace it. All the instructions I see for removing and replacing a kitchen sink basket start by removing the lock nut underneath:
My sink, however, doesn't have a lock nut. The pressure cup is plastic and I have no idea how to remove it.

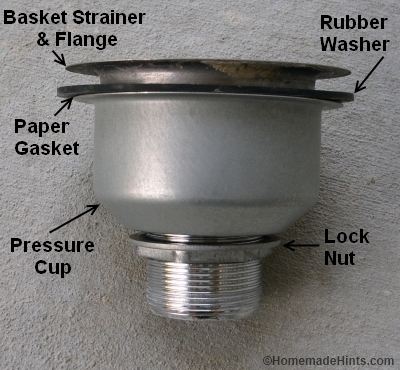
Here's what it looks like from the top. I tried holding that little center piece steady with a screw driver and tried to unscrew the basket from beneath, but it just turns and turns and won't loosen. Any ideas?
Blanco Basket Strainer Assembly
This looks like a chinese unit one of my granite suppliers used to use. they are the biggest piece of junk on the planet. if i remember correctly, the small screw in the middle acts as a retainer for the whole unit. you have unscrew it from above, and it holds the whole thing together. the problem we had was that the screw got locked into the metal insert thats in the lower plastic section and just seizes right up. our solution was a heat gun. just melt the lower bowl and keep pulling it out in chunks until you can get a grinder in and cut the bolt. then throw everything away and start again, using a quality metal strainer assembly
That screw from the top is threaded into a brass insert which is pressed into the large plastic cone. These bushings sometimes start to turn in the plastic and you cannot unscrew the drain. You’ll need to cut away the plastic portion, just underneath the steel strainer at the top. Usually there are 4 plastic arms that hold the retainer in the middle of the plastic cone. Use a cutting drill bit on your drill to get in there and cut the plastic away. Once you cut away these pieces, the drain will come out, just pull up on it. you’ll then need to go to a hardware store and get a complete drain.
Highly active question. Earn 10 reputation (not counting the association bonus) in order to answer this question. The reputation requirement helps protect this question from spam and non-answer activity.Introduction Quick and easy fix for a leaky kitchen sink basket strainer. Replace the basket strainer yourself in just an hour and save the cost of a visit from the plumber.
How To Fix A Leaky Sink Strainer In 4 Easy Steps
Fill up the sink with water and touch a facial tissue between the bottom of the kitchen sink drain and the sink. If the tissue picks up any water, you’ve got a leaky basket strainer and it’s time to learn how to remove a sink drain.
Loosen the coupling nut at the base of the kitchen sink strainer basket with a slip-joint pliers and slide the nut completely off the threads. If the basket spins, hold it tight as in this photo.

Use 16-in. slip-joint pliers or spud wrench to unscrew the kitchen sink strainer locknut. If the entire basket spins, insert the handles of a pliers into the strainer grate from above and stick a screwdriver between the handles to hold it still. Reach over the front of the sink, or have an assistant hold the screwdriver from above. If you can move the drainpipe out of the way, you can insert the pliers handles up into the strainer grate from the bottom to get a better handle on it yourself.
Kitchen Sink Drain Assembly With Strainer Basket & Stopper
Roll plumber’s putty between your hands into a rope the size of a pencil and wrap it around the lip of the kitchen sink drain opening. Press the kitchen sink strainer firmly down into the putty, add the rubber gasket, friction ring and locknut under the sink, and retighten the locknut.
If you discover a puddle of water in the cabinet under your sink, it may be caused by a leaky basket strainer. Old plumbing fittings can be tricky to loosen, but we’ll show you how to tear them apart and put them back together without any strain. You can pick up all the necessary supplies at a hardware store or home center.
To be sure the leak is coming from the basket strainer instead of a pipe joint, test the basket for leaks as shown in Photo 1. Once you confirm that the basket strainer is leaking, begin the removal process (Photo 2). Photo 3 shows how to remove the strainer locknut, which holds the basket tight to the sink. If the locknut is rusted in place, spray it with penetrating oil. If you don’t have large enough pliers to get a good grip, loosen the locknut by tapping the locknut with a hammer and an old chisel. (If the locknut won’t move, see the next step, below.) Completely remove the locknut, friction ring and gasket, and lift the old basket out of the sink.
So Easy To Install The Sink Strainer With One Illustration
Scrape off the old putty with a plastic putty knife so you don’t scratch the sink. Seal the new basket in the sink with plumber’s putty as shown in Photo 4. Plumber’s putty cannot be used on certain new sinks, but these will be labeled to that effect. If you can’t use plumber’s putty, use a non-water-based silicone. Excess putty will squeeze out between the new basket strainer and the sink when you tighten the locknut in place. Wipe it off with a rag or paper towel. Make sure to insert the cardboard friction ring between the rubber gasket and the locknut so the locknut spins freely, without catching on the gasket.
If all else fails, chuck a metal cutoff wheel into a rotary tool and cut the locknut. Cut until you reach the cardboard ring above the nut. Don’t cut into the sink. If the nut still doesn’t spin, fit your chisel into the cut area and smack it with a hammer to crack it open. Wear eye protection.

You have to spend at least $50 to get a high-quality kitchen sink basket strainer assembly with a durable finish and a reliable stopper mechanism. The best strainers have either a spin-lock or a twist-and-drop style stopper. The spin-lock stopper doesn’t have any parts that can wear, but screwing it in and out can be annoying. The twist-and-drop style is much easier to use but requires occasional O-ring replacement.
Sink Strainer Kitchen Sink Drain Assembly Kit 3 1/2 Inch With Kitchen S
Avoid push-in style strainers that have a nonreplaceable neoprene stopper or a plastic knob. The plastic parts break and can lose their sealing ability if exposed to boiling water.
We are no longer supporting IE (Internet Explorer) as we strive to provide site experiences for browsers that support new web standards and security practices.

Roll plumber’s putty between your hands into a rope the size of a pencil and wrap it around the lip of the kitchen sink drain opening. Press the kitchen sink strainer firmly down into the putty, add the rubber gasket, friction ring and locknut under the sink, and retighten the locknut.
If you discover a puddle of water in the cabinet under your sink, it may be caused by a leaky basket strainer. Old plumbing fittings can be tricky to loosen, but we’ll show you how to tear them apart and put them back together without any strain. You can pick up all the necessary supplies at a hardware store or home center.
To be sure the leak is coming from the basket strainer instead of a pipe joint, test the basket for leaks as shown in Photo 1. Once you confirm that the basket strainer is leaking, begin the removal process (Photo 2). Photo 3 shows how to remove the strainer locknut, which holds the basket tight to the sink. If the locknut is rusted in place, spray it with penetrating oil. If you don’t have large enough pliers to get a good grip, loosen the locknut by tapping the locknut with a hammer and an old chisel. (If the locknut won’t move, see the next step, below.) Completely remove the locknut, friction ring and gasket, and lift the old basket out of the sink.
So Easy To Install The Sink Strainer With One Illustration
Scrape off the old putty with a plastic putty knife so you don’t scratch the sink. Seal the new basket in the sink with plumber’s putty as shown in Photo 4. Plumber’s putty cannot be used on certain new sinks, but these will be labeled to that effect. If you can’t use plumber’s putty, use a non-water-based silicone. Excess putty will squeeze out between the new basket strainer and the sink when you tighten the locknut in place. Wipe it off with a rag or paper towel. Make sure to insert the cardboard friction ring between the rubber gasket and the locknut so the locknut spins freely, without catching on the gasket.
If all else fails, chuck a metal cutoff wheel into a rotary tool and cut the locknut. Cut until you reach the cardboard ring above the nut. Don’t cut into the sink. If the nut still doesn’t spin, fit your chisel into the cut area and smack it with a hammer to crack it open. Wear eye protection.
You have to spend at least $50 to get a high-quality kitchen sink basket strainer assembly with a durable finish and a reliable stopper mechanism. The best strainers have either a spin-lock or a twist-and-drop style stopper. The spin-lock stopper doesn’t have any parts that can wear, but screwing it in and out can be annoying. The twist-and-drop style is much easier to use but requires occasional O-ring replacement.
Sink Strainer Kitchen Sink Drain Assembly Kit 3 1/2 Inch With Kitchen S
Avoid push-in style strainers that have a nonreplaceable neoprene stopper or a plastic knob. The plastic parts break and can lose their sealing ability if exposed to boiling water.
We are no longer supporting IE (Internet Explorer) as we strive to provide site experiences for browsers that support new web standards and security practices.

0 Comments
Posting Komentar